When it comes to SEO and URLs, it’s a beauty contest.
This is a contest you want to win because search engine optimization (SEO) is a hugely important factor in web marketing. While SEO can seem like black magic, generally search engines give higher page ranks to websites that display relevant content in a clear manner. This now includes the content and structure of a web page’s URL.
In case you need a little refresher, URL stands for uniform resource locator and is what you type in your browser’s address bar to direct you to a website (ex: http://www.credera.com).
But in the eyes of search engines, not all URLs are created equal. Some URLs are ugly and some are pretty.
Here’s an example of an ugly URL: http://www.youtube.com/watch?v=jofNR_WkoCE
Looking at the URL, I can tell that I am watching a YouTube video, but I have no idea what the video is about and the random uppercase and lower case letters look just plain ugly.
In contrast, here is what a pretty version of that same URL might look like: http://www.youtube.com/what-does-the-fox-say
Oh! It’s “What Does the Fox Say?” I’ve had that stuck in my head for weeks! This URL looks much nicer and it is easy to understand what it points to. More importantly, search engines like pretty URLs and making search engines happy increases your website’s visibility.
WORDPRESS PERMALINKS MAKE URLS PRETTY
WordPress is one of the most popular and easily accessible blogging and content management systems (CMS) available. It can be used to create a company blog, a professional website, and manage all kinds of content.
WordPress can be configured to use permalinks, which resolves the ugly URL issue. Permalinks can turn this URL: https://www.credera.com/blog/technology-insights/java/?p=35 into this: https://www.credera.com/blog/technology-insights/java/java-8-part-1-lamdas-streams-functional-interfaces/. That is much more descriptive, isn’t it?
MAKE YOUR PERMALINKS NOT STINK IN IIS
Configuring Permalinks is super straightforward in WordPress… unless you are using Internet Information Services (IIS) to host your site.
DISCLAIMER: WordPress should be hosted on a Linux-based server running Apache. It is definitely not recommended to host WordPress on a Windows Server running IIS. Doing so can cause certain features to function improperly. Specifically, permalinks do not work correctly out-of-the-box in IIS.
That being said, you may find yourself in a situation where you are working with a WordPress site that is running on IIS and you will probably want to configure the permalinks. Follow the quick steps below to get permalinks running on IIS in no time.
STEP 1: VERIFY THE URL REWRITE MODULE IS INSTALLED
In order for permalinks to work, the URL Rewrite Module 2.0 for IIS 7 needs to be installed on the Windows Server that WordPress is hosted on.
To check if it is already installed, open a Windows Explorer window and navigate to the following folder: %SystemRoot%\system32\inetsrv\. In here we are looking for the rewrite.dll file. If it exists, the version can be checked by right clicking the file à select Properties à select the Details tab and view the Product Version field. URL Rewrite 1.1 has a File Version of 7.1.490.43 and URL Rewrite 2.0 has a File Version of 7.1.761.0 or 7.1.871.0.
If rewrite.dll does not exist, then you will need to install the URL Rewrite Module. Downloads for the URL Rewrite Module 2.0 can be found here.
STEP 2: CREATE A WEB.CONFIG FILE FOR WORDPRESS
A web.config file will need to be created and placed in the root directory of the WordPress installation.
To do this, create a new file in a text editor and name it web.config. Paste the following XML into this file and save it:
<?xml version=”1.0″ encoding=”UTF-8″?>
<configuration>
<system.webServer>
<rewrite>
<rules>
<rule name=”wordpress” stopProcessing=”true”>
<match url=”.*” />
<conditions logicalGrouping=”MatchAll”>
<add input=”{REQUEST_FILENAME}” matchType=”IsFile” negate=”true”/>
<add input=”{REQUEST_FILENAME}” matchType=”IsDirectory” negate=”true” />
</conditions>
<action type=”Rewrite” url=”index.php” />
</rule>
</rules>
</rewrite>
</system.webServer>
</configuration>
Once the web.config file has been created, move it to the root directory of your WordPress installation on your server.
STEP 3: CONFIGURE PERMALINKS IN WORDPRESS
Now that your IIS server is ready to deal with permalinks, let’s enable them in WordPress.
- Log in to your WordPress site as an administrator.
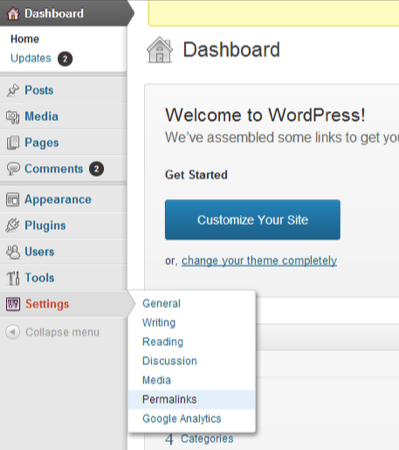
- Hover over the Settings menu in the left-hand navigation bar and select Permalinks.

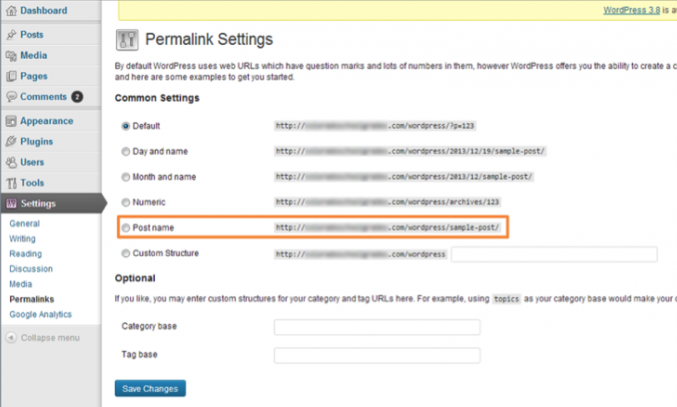
- In the Permalinks Settings page you will find several options for how permalinks can be displayed. The default option is to use an ugly query string with a page number. The most popular option is probably Post Name, but you can use whichever option best suits your needs.

- Once you have selected your preferred permalink setting, click Save Changes.
Permalinks are now enabled on your IIS-hosted WordPress site! To test it out, navigate to a page that previously had an ugly URL and bask in its new-found beauty.
